UIKit, FOP and other shenanigans
UIKit is a user interface framework for making iOS apps. It comes from AppKit, its macOS counterpart, which dates all the way back to a rather obscure operating system from the 80s called NeXTSTEP. The entire deal of NeXTSTEP was that it was an object oriented environment for making GUI apps. The developer would use Objective-C, a wacky blend of C with insane syntax and, most importantly, objects, to build their apps. This "environment" was even ported to Windows NT or Sun Solaris, and nowadays lives on in the GNUstep project.
UIKit, originating from AppKit, originating from NeXTSTEP, is thus a heavily object oriented framework which shares many design patterns with the original NeXTSTEP. If you aren't a fan of OOP, you will want to off yourself.
You might have also heard of SwiftUI as the next big Apple framework, which will not only replace UIKit but also AppKit and become the definitive way of making apps for all Apple platforms. And while SwiftUI has come a long way since its introduction, it is still nowhere near as featureful as the aforementioned two. In many cases it still relies on UIKit or AppKit components for its UI elements, and understandably so with AppKit and UIKit being so deeply baked into their respective operating systems. Point is, neither AppKit or UIKit are going anywhere any time soon.
Something about me you should know is that I like wacky things. UIKit, being so old and object oriented, is the definition of wacky. And opposed to SwiftUI it gives you much more control over how you build your UI and how the UI behaves, which is something I like; I like having the ability to easily shoot myself in the foot. SwiftUI can at times feel like a magic box, you put some code in on one side, it spits out UI on the other and you have no idea what or why or how. This is why UIKit seems preferable to me, and why I wanted to take a deeper dive into it.
FOP
FOP, Finnegan's Overlaying Program (not at all inspired by GIMP), is a little app I've made that lets you put text over images. I got this idea when I quickly wanted to add some text to a meme, but I didn't have a computer nearby to run a program like GIMP and I didn't really want to download some shady, ad-infested app from the AppStore. I'm sure I could eventually find an app that would do the job, but where is the fun in that when I can make that app myself, plus it would be a great opportunity to learn UIKit. And so... I did!
Now remember, if you are someone experienced with UIKit, I am a complete beginner and thus all your best UIKit practises for safe and performant apps should be collected and thrown out of the window. To be fair, I think I did a pretty good job, but don't expect any spectacular code; it's just me having a little bit of fun.
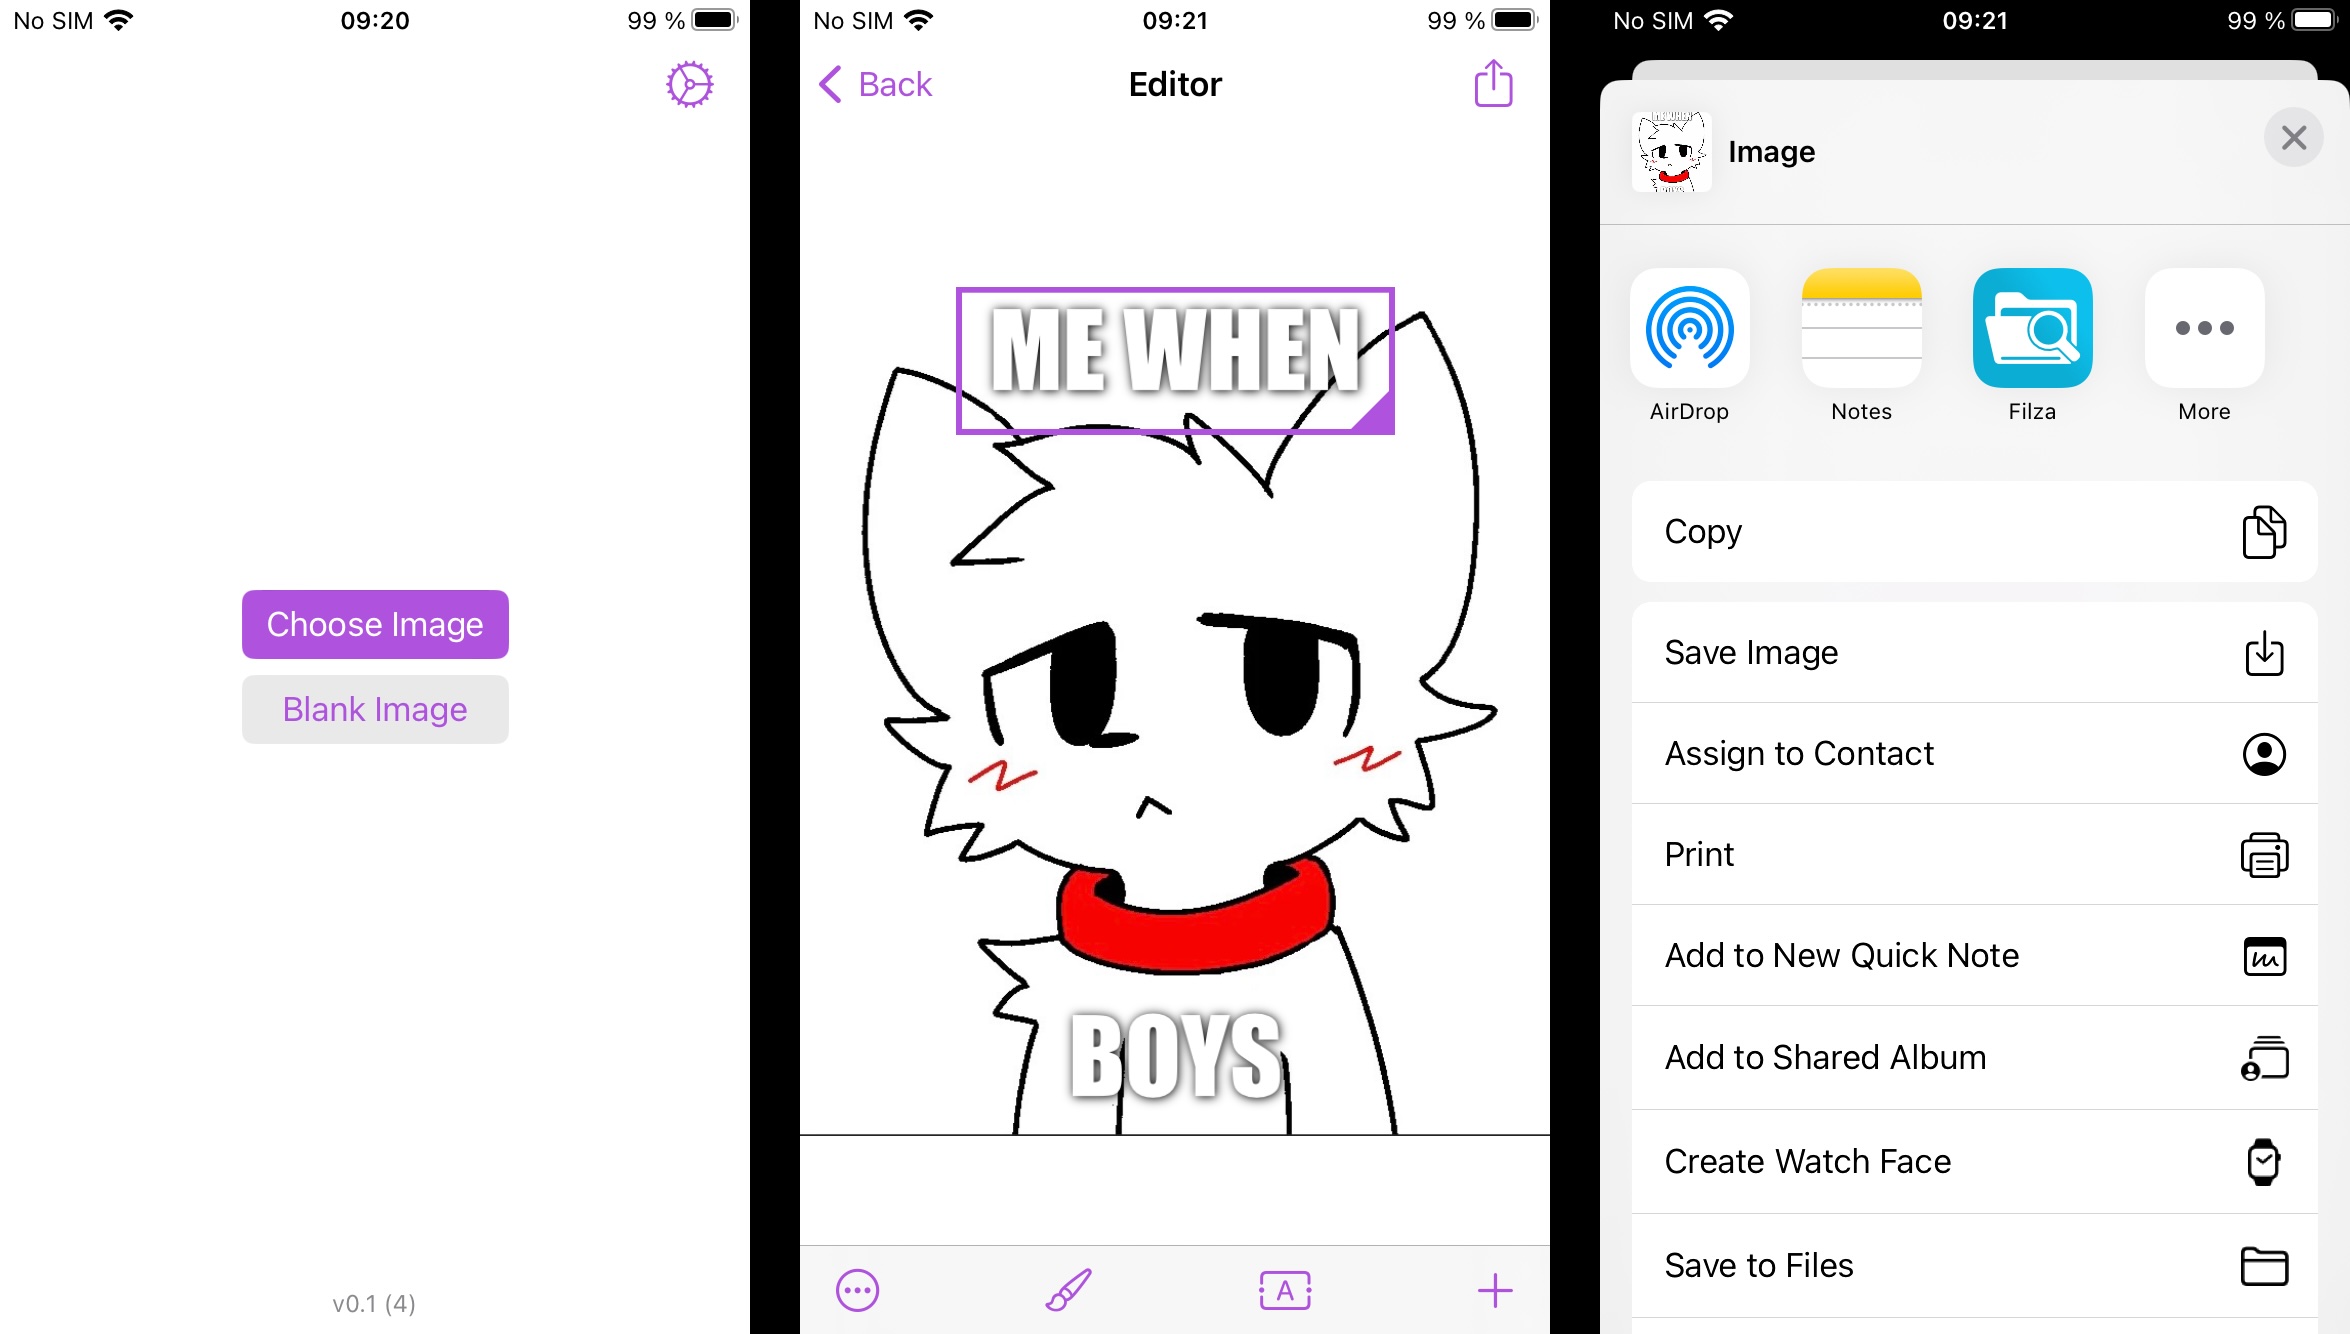
The app is really simple. Upon launch you are presented with a screen to choose an image you want to edit, after which you are presented with a simple editor for adding, moving, re-sizing and styling text. Every chunk of text you add is its own layer which can be styled separately and moved around just by dragging (breathtaking features I know). Once you are happy with your creation, you can export it either as a PNG or JPEG. Here is the app flow in a few screenshots:
UIView and CALayer
The actually interesting thing I want to talk about here is how my app handles drawing layers and responding to interactions (like dragging or resizing). Originally I experimented with each layer of text being its own separate UIView. Since UIViews are designed to hanlde user interaction, this allowed me to implement behavior like dragging or resizing very easily. Each view had its own gesture recognizer and could handle these interactions all on its own.
This approach was really nice for me as the developer... but not great for performance. Turns out UIView is actually a pretty bloated object, at least for the purpose I was using it for. I quickly discovered that iOS really isn't a fan of having large UIViews, I'm talking over 1000 pixels in any dimension which can happen if the image you are adding text to is large. Having each view have its own gesture recognizer perhaps didn't help either. This lead to absurd memory usage with only one or two larger layers, and that lead to iOS killing my app all the time.
I had to conclude I didn't really need each text layer to be able to handle interactions by itself, even if that made my life much easier, I could simply have one gesture recognizer on one view, and that view would draw the individual layers and handle their movement. So I diverted my attention inside of UIView, specifically to what draws the view. There are several ways in which you can draw on screen using UIView, described in this fantastic article (both parts 1 and 2). Long story short, using CALayer is the most performat out of them.
CALayer is actually what backs drawing on all common views on iOS, such as UIButton or UILabel. Unlike UIView, CALayer is purely for drawing, it has no sense of interactions or placement. In a gross oversimplification, you could say UIView is merely a wrapper around CALayer that gives it the ability to detect user events.
As I mentioned, every view on iOS has a CALayer behind it. In fact, every view can have multiple CALayers behind it and each CALayer can contain many layers and so on. This is exactly what I needed! My main overlay view can simply contain many CALayers which each correspond to one text layer. This overlay view will then handle all user interaction, like detecting when a particular layer is being tapped, dragged or resized.
So, to summarize, every layer you see when editing an image in FOP is a CALayer, all of which are controlled and contained by a view placed on top of the image. This view tracks all user events in its own coordinate space, which means I have to do some math myself to convert these interactions to the layers properly, but in return I get nice performant drawing and much more sane memory usage.
I would also like to point out here that if you are using CALayer to draw the contents of a view (like I am using many CALayers), the standard setNeedsDisplay() method on UIView won't work to update its contents; you must call the setNeedsDisplay() method on the layer itself, as such:
view.layer.setNeedsDisplay()
This definitely tripped me up a few times.
Types of CALayer
On the topic of layers, there are many kinds of CALayer, each designed to make a specific task easier. There is CATextLayer for drawing text, CAShapeLayer for drawing complex bezier paths, or CATiledLayer for drawing huge areas of content, such as maps. In my app I mainly use CATextLayer because, you know, it's an app for putting text over images.
CATextLayer allows basic styling of text, such as font, size or style. To have full control over the design of the text, you can pass a NSAttributedString to the layer and have any kind of text you want.
Rendering CALayer
When it comes to rendering the layers into an actual image, there is a handy method on CALayer called render(in:). It will, as the name suggests, render the layer into a CGContext you provide. So, to render the finished project, my app simply makes an instance of UIGraphicsImageRenderer, renders the previously selected image into the renderer's graphics context, and renders the text layers on top of that image with the render(in:) method. The rendering code is literally just this:
let renderer = UIGraphicsImageRenderer(size: image.size, format: graphicsFormat)
let outputImage = renderer.image { ctx in
    image.draw(at: .zero) // draw image

    for layer in layers {
        layer.render(in: ctx.cgContext) // draw text layers
    }
}
Notice the format parameter which the UIGraphicsImageRenderer initializer takes. This allows you to customize the behavior of the renderer, including the scale of the output image. This is important because, for reasons I won't get into here, the renderer's scale isn't set to 1 by default, so you will get images that are either smaller or larger than the original image. This scaling thing also caused me a bit of a headache, as I couldn't figure out why my images are being exported at twice their original resolution. I thought I messed up some math somewhere in the drawing code, but it was simply the scale of the renderer set to the incorrect value. Here is how you can set it:
let graphicsFormat = UIGraphicsImageRendererFormat()
graphicsFormat.scale = 1
Pass graphicsFormat to the image renderer's initializer.
One more thing about rendering CALayer I should mention is that, for whatever reason, the render(in:) method does not respect the layer's position stored in its frame property, always drawing your layer at position [0, 0]. You can counteract this by translating the graphics context by the appropriate amount to position the layer where you want it. I made this more convenient for myself by creating my own subclass of CALayer and overriding the render(in:) method to add some translation.
override func render(in ctx: CGContext) {
    ctx.saveGState() // save the previous graphics state
    ctx.translateBy(x: frame.origin.x, y: frame.origin.y) // move layer to its position
    super.render(in: ctx) // actually render the layer
    ctx.restoreGState() // revert the changes to not interfere with other stuff
}
Storyboarded
I'll also briefly talk about how I deal with storyboards in FOP. Storyboards basically provide a WYSIWYG way to design your app's interface. Some people prefer to instantiate and place all views manually in code, but I don't suffer from this illness. You can access view controlles designed in a storyboard by the storyboard ID you assigned to them. This process of fetching the right view controller from a storyboard by its ID isn't too consuming, however as your app grows it can easily become repetitive and difficult to keep track of.
To combat this in FOP, I decided to use a concept I discovered in an article by Paul Hudson; the Storyboarded protocol. It's simple, you declare a protocol which all your view controllers will conform to, and which will handle all the fetching and instantiation for you. You also make sure to set the storyboard IDs of each view controller to the name of the class; so if you have a view controller called ViewController, its storyboard ID should be "ViewController". This will make it so that the Storyboarded protocol can simply look at the name of the class and know which storyboard ID to use to get the right view controller. Here is my implementation:
protocol Storyboarded {
    static func instantiate() -> Self
}

extension Storyboarded where Self: UIViewController {
    static func instantiate() -> Self {
        let storyboard = UIStoryboard(name: "Main", bundle: nil)
        let id = String(describing: self) // get the name of the class
        let vc = storyboard.instantiateViewController(withIdentifier: id) as! Self
        return vc
    }
}
This way, all the code you have to write to instantiate a view controller is...
ViewController.instantiate()
...and it will do all the work of finding the right one for you. It might not seem like a lot, but even for a simple app like mine, with not too many view controllers, it still makes life much nicer.
Compatibility
UIKit is old, however that does not always have to be a disadvantage. I've talked here about how I prefer its philosophy to SwiftUI, but there is also another nice side effect of not using the latest and greatest tool; your app supports older devices! Currently my app can run on iOS 15 and up, which is not the oldest release (4 years old) I could theoretically support without much major fuss, however this version runs on devices as old as the iPhone 6s (released in 2015), which is pretty good. This would simply not be possible in SwiftUI without giving up on many major life-saving features that were introduced over the years (Observation my beloved).
UIKit is also much easier to dissasamble and reverse-engineer, partly because it's an Objective-C framework, partly because SwiftUI's way of declaring user interfaces is really absurd on the level of assembly. Not that this has any significant benefit to my app, but its nice to poke around in 3rd party apps from time to time.
What have I learned
I have certainly had fun making this app (and still am since it's not exactly done). Is it the most original idea? No. Am I having fun? Yes. Am I learning UIKit? Absolutely. And that's all that matters. If you want to have a look at the code or try the app yourself, the source is on GitLab.
As for my future plans, I think with my newly ignited passion for UIKit I could try making an app for some really old iOS, say for the best iOS version ever, iOS 6. I even have an old iMac which would make the coding feel way more authentic I think. Or, speaking of Mac, I could take a look at UIKit's macOS counterpart, AppKit, which would also be really interesting since it's kinda the same thing but also not really. But oh well, that's up until next time.
Thanks for reading!
